At least the ones I have photos of Editing Note- When I started building the Night Heron in 2014, I had no idea that I would do a blog about the experience. These posts are recalling the build from memory with a few photos. To recap, I took pictures while I was building the boat…
Cedar Strip Kayak
Hitting the deck
Another change in stapling I would use is to make sure the staples are lined up. Many times, the staple would be slightly angled. This had the effect of making the staple line look a little wider. It’s a small detail but it’s all part of learning. If I had it do over again, I’d…
Setting up the frame…while building a boat
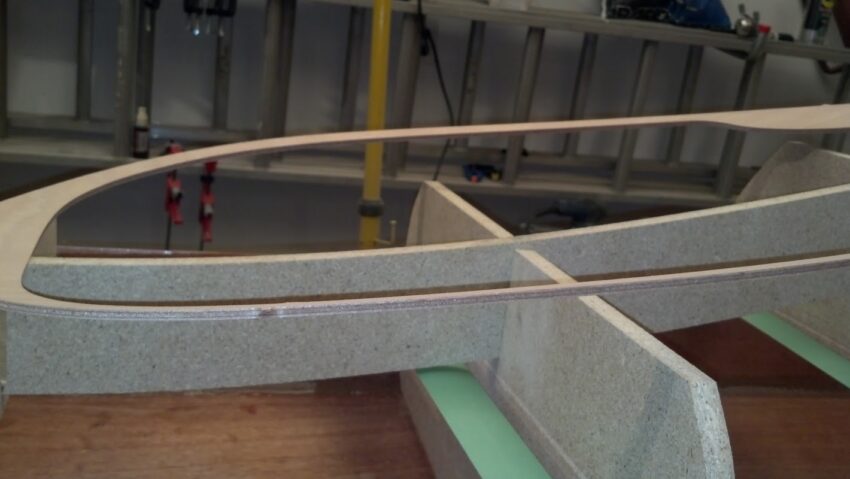
A hybrid-type kayak (two types of construction techniques) still use forms for the deck, they’re just set up a little differently. The Great Auk used a strong back with forms that shaped the complete boat. The Night Heron uses the hull to hold the forms. That’s why it was so critical to set the workspace…
Finishing the Hull
Once the hull forms were fastened firmly to the work surface and the hull was trued up, it was time to re-enforce the plywood joints. Using the recommended technique, I mixed a couple of ounces of marine epoxy then added wood flour to the epoxy. Wood flour is finely ground sawdust that is used to…
Starting the hull
The Night Heron hull is assembled using the stitch and glue technique. You literally stitch the pieces of the boat together using wire. The hull panels came pre-cut and also were pre-drilled for the wire to be thread through. I failed to get good pictures here, posting about building the boat had not even crossed…
Setting up the workspace and getting started with the hull
The Night Heron is formed a little different than most other kayak builds. Instead of using forms on a strongback, the Heron is started with forms sitting flat. This is kind of hard to explain but here goes. This is an example of the use of a strongback. It’s how the Great Auk is formed….
Why I chose the Night Heron
I started the kit selection process by digging through Chesapeake Light Craft’s website. I knew I wanted something longer than a recreation-length boat (13-14′). And something pretty fast. After narrowing down the choices, I emailed CLC and got a quick response from John Harris, the owner. He recommended the 18′ Night Heron. He also suggested…
Night Heron
When I first decided to upgrade my kayak I had no idea it would lead me through some wonderful yet challenging projects. I built the Night Heron in 2014, taking some photos along the way. But certainly no other documenting of the build. When I started the African Queen 18, “blogging” about the process as…

Back on top baby, back on top!
As a reminder, this blog was not supposed to be about our paddling antics; racing, travel and what-not. But…that wasn’t a rule, it was more like a guideline. That said, it was as though nothing bad had happened to the Great Auk. The boat still paddled straight (very important) and fast (not quite as important…

Almost fixed
With the repair, I made the boat much stronger. After layering the 4oz cloth (4oz per sq. yrd.), I let the epoxy cure for a few hours then added another layer of 4oz. More cloth holds more epoxy so the trade off is weight. By adding two layers inside the cockpit, I estimate the complete…

My old friends the magnets
I didn’t get many photos of this part of the repair.

Assessing the damage
To get a clear idea of what needed to be fixed I had to mostly strip the boat of it’s hardware. After removing the seat and back, I took out the foam bulkheads. One of the cracks had extended forward into the hatch area. The only way to repair it properly was to remove the…
A fond farewell to the African Queen 18
So… in this clip the Queen successfully shoots the Amazon rapids. Bogey and Hepburn fall in love. If I had a clip from the Pewaukee River rapids it would view more like the end of this movie. ***Spoiler Alert*** It would have the AQ18 mortally wounded, swamped and floating just above the surface sans the…

Pewaukee, we’ve got a problem!
I didn’t plan on doing any more posts about the boats. The stories has been told, embellished and generally classified as legends but alas there is apparently one more chapter to be chronicled. Our first paddling race/event of 2021 was in Pewaukee Wisconsin May 8th. An 8 1/2 mile paddle down the narrow and shallow…
Finally, the maiden voyage
After seven months, it’s complete. I think it turned out OK. Sure the design was ambitious and if you get too close you can see little mistakes. But overall it was a success. The boat is not tippy, very stable and slides into turns much easier than the Pungo poly boat. It is much narrower…
A few last details
Although the boat was complete, there was still a small detail to deal with. It’s called an end pour. When the deck and the hull are epoxied together, fiberglass tape is used to re-enforce the seams. However, you can only get so close to the bow and the stern. There is a few inches that…

The whole thing was rigged part 2
The boat needed two hatches fore and aft. This is one of the scariest points in construction. Cutting into a perfectly good boat. By the way, you may have noticed that some of the pictures seem out of sequence. The hatches construction pictures are an example. I built the hatches before the varnishing. It’s almost…
The whole thing was rigged part 1
With the boat finish complete, it was time for rigging. It’s adding the final touches.
Building a boat tackfully
With the booth built I started varnishing. I started on the deck, taping the edge to keep any drips off the hull. I let the finish dry for 8 hours then flipped the boat to do the hull. I let that dry overnight, then wet-sanded with 320 grit. This took off the few drips, and…
Varnishing can be a very tents experience
With the all the epoxy done, it was varnish time. Epoxy/fiberglass finish is incredibly strong. However the one weak point of epoxy is sunlight. UV rays can break down the finish in a year or two, causing delamination and failure. Varnish prevents that, or at least slows it down. Varnish itself can be broken down…
Epoxy, sand, rinse, repeat
Carefully doing the math, a coat of epoxy on the outside of the boat adds 12oz of weight. Knowing that I made sure that the two additional coats would be all I need for a smooth finish. Each coat was rolled on with foam roller then any drips or runs were smoothed out with a…
Now comes the hard part
This next step, for me at least, is the most difficult step of building a kayak-attaching the deck to the hull. It requires working with sticky epoxy and uncooperative fiberglass. It requires patience and a steady hand, not the thing to do if you’re in a hurry and all coffee-ed up. The process is to…
That’s a bit cheeky
Setting and attaching the cheek plates was a bit tricky. I needed to makes sure that both stayed perpendicular so each were even. It would be no good or fun to have one plate cockeyed and digging into said cheek.
Finishing the coaming details
I knew that building the coaming lip was rather involved based on the my previous build of the African Queen 18. I also knew it would be worth it when completed. Spoiler Alert: It turns out pretty nice. I ripped 1/8″ strips of ash and walnut (previously referenced sources of a wedding display and the…
What a fitting post
I now have two almost complete sections of the boat. A clam-shell deck and hull if you will. This was the best time to locate some important points on the boat: center of balance and proper weight distribution. With my previous projects, setting the peg and seat locations was more or less guessing with lots…
Rising to the occasion once again
You will notice at the end of the post, the cockpit will not be completed. Building this type of coaming has multiple steps that didn’t necessarily work out sequentially. So finishing this part of the boat will be in at least one other post.
Moving along…
I’ll use this post to move the project along. Wait, it’s white, or at least translucent. No it’s actually clear, it’s the light that is refracting through the fibers that cause it to turn white. In the photos of the embed coat, you can still see the texture of the weave. That’s because the light…
Clear as glass
Sanded and ready, it was time to glass the hull. I used 4oz fiberglass cloth that came with the kit. 4oz means four ounces weight per square yard. I used about 15′ of cloth 50″ wide. That piece, before trimming, weighed how much? Anyone? Anyone? Fiberglass cloth comes in all kinds of weights and weaves….
Figuring out the cockpit
The Great Auk has a generous size cockpit but I wanted to add some detail to accent the opening. I found quite a few examples on the interweb and chose a basic design. A recessed cockpit for lack of a better description, creates an “apron” around the cockpit. Some recesses are small areas in the…
Thank goodness I started this project when I did.
When I built my Night Heron, I started just before Christmas and completed the final rigging the first week of April. When I opened the box to start the Great Auk in September, I really thought I was getting a head start and would have the boat built by Christmas, finish it out in January,…
Hitting the deck
Once the hull was planked, I needed to flip the boat but still keep the hull on the frame. I made a couple of cradles to the curve of the hull. I simply used the plans and chose a couple of form outlines, laid them down on some plywood and used pushpins to mark the…
The hull is complete…sort of
After gluing in the lattice, I was able to complete the planking of hull. From the pictures, you can see that some of the joints are not all that good. I had the wood curving back and forth and it’s not always easy to get a perfect fit. Most of the planks had the bead…
Well it seemed like a cool idea at the time
When coming up with the wood design for the Great Auk I saw a number of boat photos using what I call a lattice detail. The detail uses small, alternating color pieces of wood oriented perpendicular to the planking, creating an eye-catching accent. Well that was the plan anyway. I thought using this lattice detail…

Just for the hull of it
After getting the shear strip set, I started planking the hull. My design called for the sides to be linear to the chine. Stop! What on earth is a chine? Well I’m glad you asked. Warning: technical stuff! A chine is the where the side of the boat transitions to the bottom of the boat….
Not board yet!
I’m going to take a moment to talk about the lumber I will be using. Cedar- The kit’s lumber (or planks as we call it in the boat building business) is primarily made up of clear (knot and blemish-free and very straight), premium Western Red and Alaskan Yellow cedar. After I placed the order for…

Setting the sheer strip is sheer madness
The first and one of the most critical steps in the assembly of a strip-built kayak is to set the sheer strip. What is a sheer strip? Well I’m so glad you asked. Let me tell you. But WARNING: sort of technical content. The sheer line is where the deck and hull meet. The line…

Setting up a frame, but this time it’s to build a boat
I ordered the complete Great Auk kit which shipped with the building frame (you can also order the kit without, for example if you are building a second boat). The strongback is the part of the building frame that runs the length of the boat and holds the forms in place. It needs to be…

It’s Here. My new 2020 project.
After much discussion and due diligence, Mary decided it might be time for a new boat. Her Pungo 14 has served very well, helping her win almost every race she enters. It’s solid, stable and able to take inadvertent abuse but a drawback to the boat is that it weighs almost 60lbs. The weight hasn’t…
Clean-up and spit-shine
Years of use leaves scratches, dings and dents. I wanted to at least get rid of some of the dings and deeper scratches so I tried a couple of ideas that I saw on YouTube. I’d already tried re-melting and fixing the the hole with heat, so I used the heat gun to soften the…
The heat is on!
This was the patch that was previously done. I thought I’d try to improve it a bit. I looked online and many of the examples had smaller patches and used colored plastic “rod” to match the boat. This patch was originally done with a laundry bottle. I worked the patch a little with a heat…
Where do I start?
If you haven’t read it yet, please read the back story about The Tandem. It will explain a lot. This is what it looked like after it thawed out. This one was rough. duct tape to re-enforce the holes of the knee bracing. The ropes had been retied several times. It was clear that these…
Perfect day for a test paddle
With everything ready to go it was time for the final test paddle. I installed the foam seat using velcro to allow for moving around to get the balance correct. This first test will tell me if I’ve got it right. Then I’ll study the video (second test) to make additional tweaks. Be sure to…
All good things
After nine months and roughly 475.00 the boat is complete. And I’m kind of proud of it warts and all. Early on it became very obvious that there were no reliable reference lines or points so I had to build it mostly by eye. The cockpit and coaming could have been wider, taller and a…
Quote of the day
“Twenty years from now you will be more disappointed by the things you didn’t do than by the ones you did do. So throw off the bowlines. Sail away from the safe harbor. Catch the trade winds in your sails. Explore. Dream. Discover.” – Mark Twain
The end pour (or “What on earth is our neighbor doing with that boat?”)
Even though the boat is under 14′, I thought I needed handles to carry it and to tie it down while it’s on the van. Similar to my Heron, I made two handles of 1 1/4″ dowel 4″ long. I drilled/routed out one side to allow room for knots. I sanded the edges and gave…
Loose lips sink ships
Once the hidden spacers were epoxied in, the next part of the hatch structure is the lip. This is where the weatherstripping seals the hole Using wider plywood strips, I cut and fit the strips to make a single-piece lip. Using fiberglass cloth for the joints actually worked out pretty well. Even cured,…
Channeling my inner-Norm: “Measure twice, cut once”
If there was ever a time to make sure you’ve got it right, it is now! There’s no do-over when cutting the hatches. It’s slicing a hole in a perfectly good boat. The cut out needs to fit right back where it came from so there’s very little room for fudging. Sanding and filling won’t…
It’s getting there
Finally it’s starting to come together. I’ve finished painting the hull and the cockpit (well not quite done in the cockpit yet). It took two coats to cover. The varnish took a little longer. I used the time-tested wet-edge technique to apply the varnish: Pick a small area about 18″ wide in most cases one…
Well the label on the can did say red
With the hull sanded and prepped, now was a good time to paint the hull (and the coaming). The weather outside called for warm and clear skies with little wind-perfect for painting. This marine polyurethane smells really strong so it had to happen outside with lots of fresh air. I taped off the waterline edge…
I thought I was done sanding!?
OK, not really. I knew this was coming. It’s time to sand the epoxy to get it ready for the varnish on the deck and the polyurethane on the hull and the coaming. The goal here is to smooth out the epoxy so that the finish has a good base for adhesion. The hull will…
The name plate has arrived
Finally, the custom name plate arrived. It’s a perfect size to fit right behind the cockpit framed by the two accent designs on the rear deck I used the tried and true method of holding the plate in place while the epoxy cured. Next, for a touch of detail, I’ll…